-
Image
-
Image
-
Image

-
Image
-
Image
-
Image
-
Image


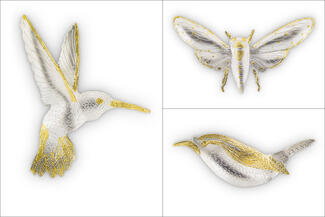
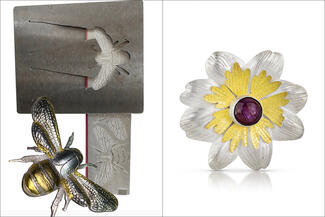
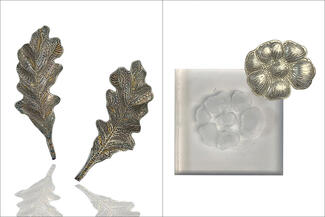
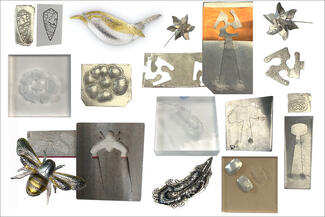
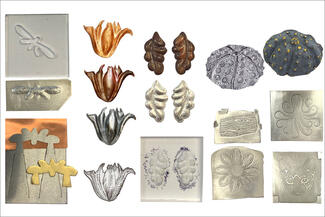
Transformative Techniques: Imagery & Etching on Die-Formed Silver
Led by two experts in the field, this dual-taught, 5-day summer workshop will teach students how to transform their own drawings, photos, and other imagery from copyright-free sources, into high contrast, black & white images that are ideal for the transformative process of etching. After etching their imagery of choice onto silver, students will enhance their 2D creations with die forming techniques to give them more dimension! From there, the class will cover how to create layouts of multiple shapes for further etching renditions and making blanking dies to quickly cut shapes of all sorts for efficiency and multiples!
This course will be utilizing a scanner, a computer with image editing software (instructions for Windows & Mac computers will be provided), and a laser printer to prepare the images. Students will also receive instruction on how to create images manually using oil-based pens.
Techniques taught:
-
Preparing images for the electro-etching process.
-
Layout for multiple images.
-
Using a t-shirt press.
-
Electro-etching silver.
-
How to use a hydraulic press.
-
How to design and make a silhouette die.
-
How to design and make a non-conforming die.
-
Creating contour with thermal plastic.
-
Layout for a blanking die that will be used with silhouette and non-conforming dies.
-
How to correctly use a saw frame and choosing saw blades for sawing tool steel.
-
How to saw a blanking die out of tool steel using a rotational bench pin.
-
How to blank out a relief form with a blanking die.
-
Tips and tricks using flex shaft accessories.
-
How to make your own forming tools.
Please read materials & tools tab thoroughly!
Meet the instructor

Elizabeth Lyne is inspired by graceful forms and patterns in nature – soft lines and swirls of feathers and fur, flower petals and butterfly wings. She has brought those impressions to her jewelry by expanding on methods of etching to create a unique process. She controls and duplicates her results to provide deep texture and detail to make her jewelry come alive.
Jayne Redman is known for her unusual way of working with metal in three dimensions, often using multiples of the same shape to convey a single idea. Using nature as her inspiration she considers combinations of form and function, integrating mechanics with design and applying innovative engineering methods. She has perfected the process of quickly duplicating shapes by cutting them out with blanking dies and then forming those shapes with tools and jigs of her invention.
Jayne and Elizabeth have combined their knowledge in this workshop.
Materials & Tools
There is a $10 materials fee for this course which is payable directly to Metalwerx upon registration. The materials kit fee covers 1 gallon of distilled water, paper towels, denatured alcohol, acetone, rubber cement, copier paper, cooking spray, and use of other miscellaneous consumable items needed for workshop objectives.
There is a $110 materials fee payable to Elizabeth via Venmo, PayPal or credit card at the workshop. The materials kit fee covers:
-
1 sheet blank PnP
-
¼ sheet pre-printed PnP
-
1 extra fine oil-based paint pen
-
10 nitrile gloves
-
copper sheet with wires (20g 6”x6” sheet)
-
6 gauge copper bar with alligator clips
-
3 sheets of Vellum
-
cardstock in a sheet protector
-
cupric Nitrate (500 grams)
-
3”x6” quilt template plastic
-
(2) 32 oz cups
-
16 cup Rubbermaid container
-
handouts
There is a $90 materials fee payable to Jayne via Venmo, PayPal or credit card at the workshop. The materials kit fee covers:
-
saw blades 4 pks - pike super and platinum
-
saw blades - skip tooth #5
-
4 Pcs. 1/4" x 3" x 3" cast acrylic
-
3 Pcs. 1/2" x 3" x 3" cast acrylic
-
thermal plastic
-
3M radial bristle discs - 80 Grit
-
2 screw mandrels
-
snap on discs and mandrel
-
#52 drill bit
-
separating discs
-
tool steel - 4"x 2" x 1/32"
-
handouts
Tools for Part One – Etching:
-
Students with access to a laptop computer should bring one. If they don’t have Photoshop, they will use an editing program called FreePhotoTool.com.
-
Copyright-free books of drawings or your own drawings or images.
-
Drawing materials including rulers, black sharpie markers in a variety of widths, pencils and erasers, compasses, and plastic circle and oval templates.
-
Apron
-
sterling silver, fine silver, or argentium in any gauge 24, 22, 20
Tools for Part Two – Forming:
-
Ball burs such as Lynx Round Bur Sets - 2.7mm to 8mm (Rio Grande #344340) and Lynx Round Bur set .05mm to 2.5mm (Rio Grande #344335)
-
Round diamond burs (Amazon)
-
Copper and/or brass 24 gauge to test dies.
-
Drawing materials including rulers, sharpie markers, pencils and erasers, compasses, and plastic circle and oval templates: Office supply store like Staples or Amazon
-
Apron
-
Dust mask
-
Safety Glasses and eye magnification, if needed
OPTIONAL:
-
Silver or gold wire for finished pieces - assorted gauges. I use 20 gauge for ear wires.
-
Wolf Wax Trimmer used with a cylinder bur to create 90 degree walls on your silhouette die for mirror image pieces
-
Wolf Wax High Speed Cylinder Bur: Rio Grande - 25mm x 6.3mm, 25mm x 4.7mm, 25mm x 3.3mm
-
Additional saw blades 2/0 or 3/0 - highly recommended
-
Super Pike Saw Blades: Rio Grande
-
Original Laser Blades: Rio Grande
-
-
Tool steel for blanking dies as well as extra materials will be available for purchase. Jayne will be supplying her rotational bench pins for students to use during the workshop. They will be available for purchase at a student discount.
NOTE: Metalwerx has many of the following for communal use, but we recommend you bring your own / extra if you have them or if you do not want to wait to use a communal tool / item.
-
basic metalsmithing tools (pliers, hammers, etc.)
-
personal optivisor
-
hand files
-
needles files
-
sanding sticks
-
safety glasses or reading glasses - for working up close
-
other personal hand tools (if not wishing to share communal tools)
-
studio apron
-
studio towel
-
closed-toe shoes - required in the Metalwerx studio
-
lunch - Metalwerx has a fridge, toaster oven, and microwave