
-
Image
-
Image
-
Image
-
Image
-
Image
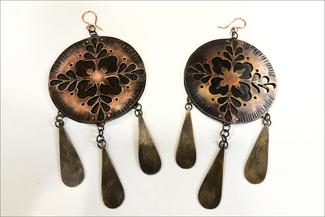


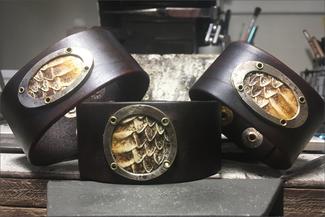
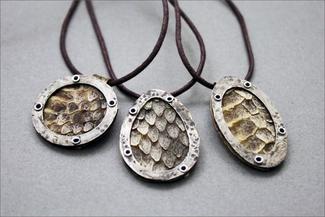
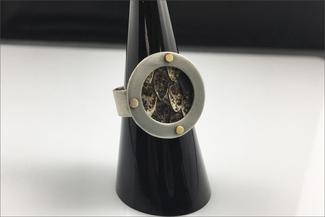
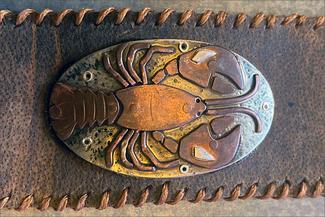
Jewelry 101 - Part 3: Riveting & Cold Connections
Sometimes heat or torch-work isn't possible in jewelry making - or, perhaps, you're looking for different aesthetic than soldering can provide. This demo-focused virtual course is designed to get you proficient in riveting, a cold-connection staple in the metalsmithing field that's a value in any jeweler's arsenal of techniques. Throughout this course, students will learn the techniques of wire and tube rivets, both providing the students an ability to join metal to metal, as well as incorporate alternative materials like leather, glass, wood, an anything else you might not want to heat up into a jewelry design.
Wire and tube rivets are the two mainstays of the process, and are what this course will be centered around mastering. Week 1 will be spent learning the basics; how to properly measure and cut the rivets to perfect length, drill through the material, and finally hammer the rivet accurately so that the metal spreads evenly, locking your two joined pieces in securely. Week two will focus on the incorporation of alternative materials, like glass/shell, cloth/leather, and woods.
We will also cover how to use telescoping tubing to create layering effects within your work - providing a sort of "relief" or negative space between layers as though they are “floating”, which is both a fantastic design element in addition to serving utilitarian purposes. The instructor will also cover some pros and cons around heating or shaping metal once it has been riveted, as well as how kinetics can come into play though the use of just a single rivet.
Meet the instructor
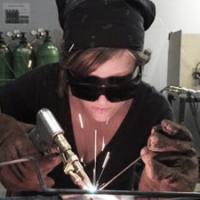
Deanna Pastel was born and raised in Cleveland, Ohio. In 2010 she received her BFA in Jewelry/Metals from Kent State University. Upon graduating, she was offered a position as a bench jeweler and trainer at Heather B. Moore Inc. in Cleveland, OH. This is where she began fine-tuning her skills in soldering gold, setting stones and hand stamping on silver and high end gold jewelry works.
In 2012 she landed in Austin, TX, and began her career as one of the main teachers and as the studio director/coordinator at Creative Side Jewelry Academy. She spent 2012-2017 developing the school’s core curriculum, while working closely with other master artists and her students.
In 2018 she was granted an apprenticeship to spend two months working alongside artist Victoria Lansford doing macro chasing and repousse, and became a presence both artistically and professionally for the Society of North American Goldsmiths. For the past three years, she has expanded to teaching at multiple schools and colleges around the Austin and San Antonio area providing eclectic and diverse course offerings at all levels of experience. She also continues to work at her bench in her home studio doing commissions, custom and repair work, as well as her personal artworks.
Materials & Tools
Students are welcome to purchase materials before or after the course. Below are options for tubing and wire in both silver and base metals (copper, brass, nickel and aluminum). All techniques covered in this course can also be applied to gold and gold-fill. The below links are for student reference for some of the lowest pricing on tubing and wire. Bulk quantities can be ordered through Rio for wire. Students are welcome to choose one metal type (ex. Copper) and buy both tubings and each wire choice. It is good to have multiple sizes on hand for different projects. If budget is something of consideration, please just buy 16g wire and the according drill bit size. Each size will be shown during class and why thinner and thicker gauges are chosen for different projects.
- Metal/raw materials - click HERE for full list.
The following supplies will be used for course demonstrations and objectives. A suggested item and/or vendor has been provided below for reference. Click the vendor name to be redirected to a page where you can view the item. The quantities needed for each item are listed first. If ordering, please be aware that some items may come in larger quantities than needed for this class. We recommend not opening an item's packaging until the day of the workshop. Student participation during or in-between class sessions is not required - observers are welcome.
Hand tools:
-
1 x round nose pliers (Rio Grande)
-
1 x chain nose pliers (Rio Grande)
-
1 x snips / flush cutters (Rio Grande)
-
1 x jewelers saw (Rio Grande)
-
1 x pack saw blades - 2/0 (Rio Grande)
-
1 x bench pin (Rio Grande)
-
1 x half round hand file - #2 cut (Rio Grande)
-
1 x rotary tool - flex shaft, micro motor, etc. (Rio Grande)
-
1 x set of needle files - #2 cut (Rio Grande)
-
1 x center punch (Rio Grande)
-
1 x chasing hammer (Rio Grande)
-
1 x steel block / steel surface (Rio Grande)
Other/miscellaneous items:
-
hard work surface
-
fan and open window - or ventilation system
-
safety glasses
-
pencil, ultra fine sharpie, notebook
-
rags/towels
-
dental floss
-
ruler