
-
Image

-
Image
-
Image

-
Image
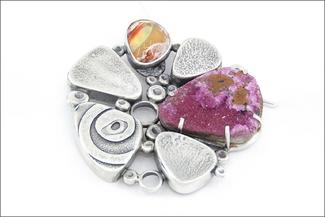


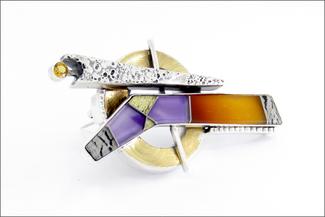
Form: The Art of Metal Manipulation
Adding dimension to one's jewelry designs can transform the work and elevate its appeal! In this demo-focused virtual class students will explore four basic metal manipulation techniques - fold forming, shell forming, forging, and hollow forms. Additionally, students will learn how combining these techniques can add an intriguing sculptural aesthetic to a piece jewelry. Instruction will focus on individual expression and Lesley will guide each student in finding their unique expression.
Meet the instructor

"When people ask how I became an artist, I often laugh and say, "It's genetic." I was raised in art. My parents met and married while they were students at the Art Institute in Kansas City. I was born shortly after they graduated and began their careers as professional artists. My father made jewelry in the 1960s and '70 and worked for Hallmark while my mother painted, sculpted, and illustrated medical textbooks until 1979, when we moved to Sedona, Arizona. This began a 30-year obsession with creating one of the top 100 Niche American Crafts galleries in the US. They both enjoy busy lives, creating and traveling the world to this day. But it was not until 1982 that the jewelry bug bit me. As an apprentice, I learned traditional native American silversmithing techniques. In 1984 I launched my career as a jeweler, and I've never looked up since. It's always been the challenges of metal smithing that I crave.
Designing pieces that challenge me technically, that speak to a certain aesthetic, is what pulls me to create. Creativity is evolution, a constant yearning for more. And of utmost importance is how it is made. Each piece is created in my studio in the tradition of the American Studio Art Jewelry movement of the 1940s through the '60s, which demands that the work is created entirely in the artist's studio. From drawing through fabrication, the piece never leaves my hands. My studio is my refuge, and I work solo."
Visit www.lesleyainemckeown.com to view Lesley's work.
Materials & Tools
The following supplies will be used for course demonstrations and objectives. A suggested item and/or vendor has been provided below for reference. Click the vendor name (in red) to be redirected to a page where you can view the item. The quantities needed for each item are listed first. If ordering, please be aware that some items may come in larger quantities than needed for this class. We recommend not opening an item's packaging until the day of the workshop. Student participation during or in-between class sessions is welcomed but not required - observers are welcome.
Metal/raw materials:
-
6"x4" x sterling silver sheet - 24g (Monster Slayer)
-
6"x4" x copper sheet - 24g (Monster Slayer)
-
8" x 4mm flat wire - 21g (Halstead)
Torch setup:
-
1 x fireproof area - steel sheet, tiles, etc. (Amazon or Home Depot)
-
1 x Solderite™ pad / pan with pumice (Rio Grande or Rio Grande)
-
1 x torch - Smith mini, Silversmith, or butane (Rio Grande or Rio Grande)
-
1 x #0 or #1 torch tip - if getting Silversmith (Rio Grande)
-
1 x striker or lighter - Silversmith system has one (Rio Grande)
-
1 x soldering tweezers (Rio Grande)
-
1 x soldering pick (Rio Grande)
-
1 x 3rd arm (Rio Grande)
-
1 x cross lock tweezers (Rio Grande)
-
1 x paste flux (Rio Grande)
-
1 x copper tongs - for pickle (Rio Grande)
-
1 x 6” silver solder - hard (Rio Grande)
-
1 x 6” silver solder - medium (Rio Grande)
-
1 x 6” silver solder - easy (Rio Grande)
-
1 x 3” silver sheet solder - hard (Rio Grande)
-
1 x 3” silver sheet solder - medium (Rio Grande)
-
1 x 3” silver sheet solder - easy (Rio Grande)
-
1 x pickle - sodium bisulfate or citric acid (Rio Grande or Amazon)
-
1 x brass bristle brush (Rio Grande)
-
1 x crock pot or lidded glass container (Rio Grande or Amazon)
-
1 x tempered glass container or sink - for quenching and rinsing
-
1 x small brush - for flux
-
1 x liquid hand soap - for cleaning metal
-
1 x box baking soda
Hand tools:
-
1 x round nose pliers (Rio Grande)
-
1 x chain nose pliers (Rio Grande)
-
1 x flat nose pliers (Rio Grande)
-
1 x snips / flush cutters (Rio Grande)
-
1 x jewelers saw (Rio Grande)
-
1 x pack saw blades - 2/0 (Rio Grande)
-
1 x burlife / bee's wax (Rio Grande)
-
1 x bench pin (Rio Grande)
-
1 x rotary tool - flex shaft, micro motor, etc. (Rio Grande)
-
1 x set of needle files - #2 cut (Rio Grande)
-
1 x scribe (Rio Grande)
-
1 x rawhide / plastic mallet (Rio Grande)
-
1 x steel block / steel surface (Rio Grande)
-
1 x sheet of sand paper - 220 to 600 grits (Rio Grande)
-
1 x sanding sticks (Rio Grande)
-
1 x ball peen hammer (Rio Grande)
-
1 x dapping set - steel or wood (Rio Grande or Rio Grande)
-
3 x pine 2x4 blocks - 6" pieces
Other/miscellaneous items:
-
super glue (hardware store)
-
epoxy (Rio Grande or hardware store)
-
hard work surface
-
fan and open window - or ventilation system
-
safety glasses
-
pencil, Sharpie, notebook
-
rags/towels